@dts350z I’ve already clearly demonstrated the value of increased dynamic range so I won’t go there again. Understand that over exposing or stretching does nothing to increase your image detail. If you don’t start with a good dynamic range from the camera there is no post processing that can increase the detail once it has been lost. Look at the sample images I provided - the subtle details are in the low four bits. Your assertion that “we are only interested in that small area to the right of the histogram peak” is not the case. You can make all the arguments you want but the images tell a different story.
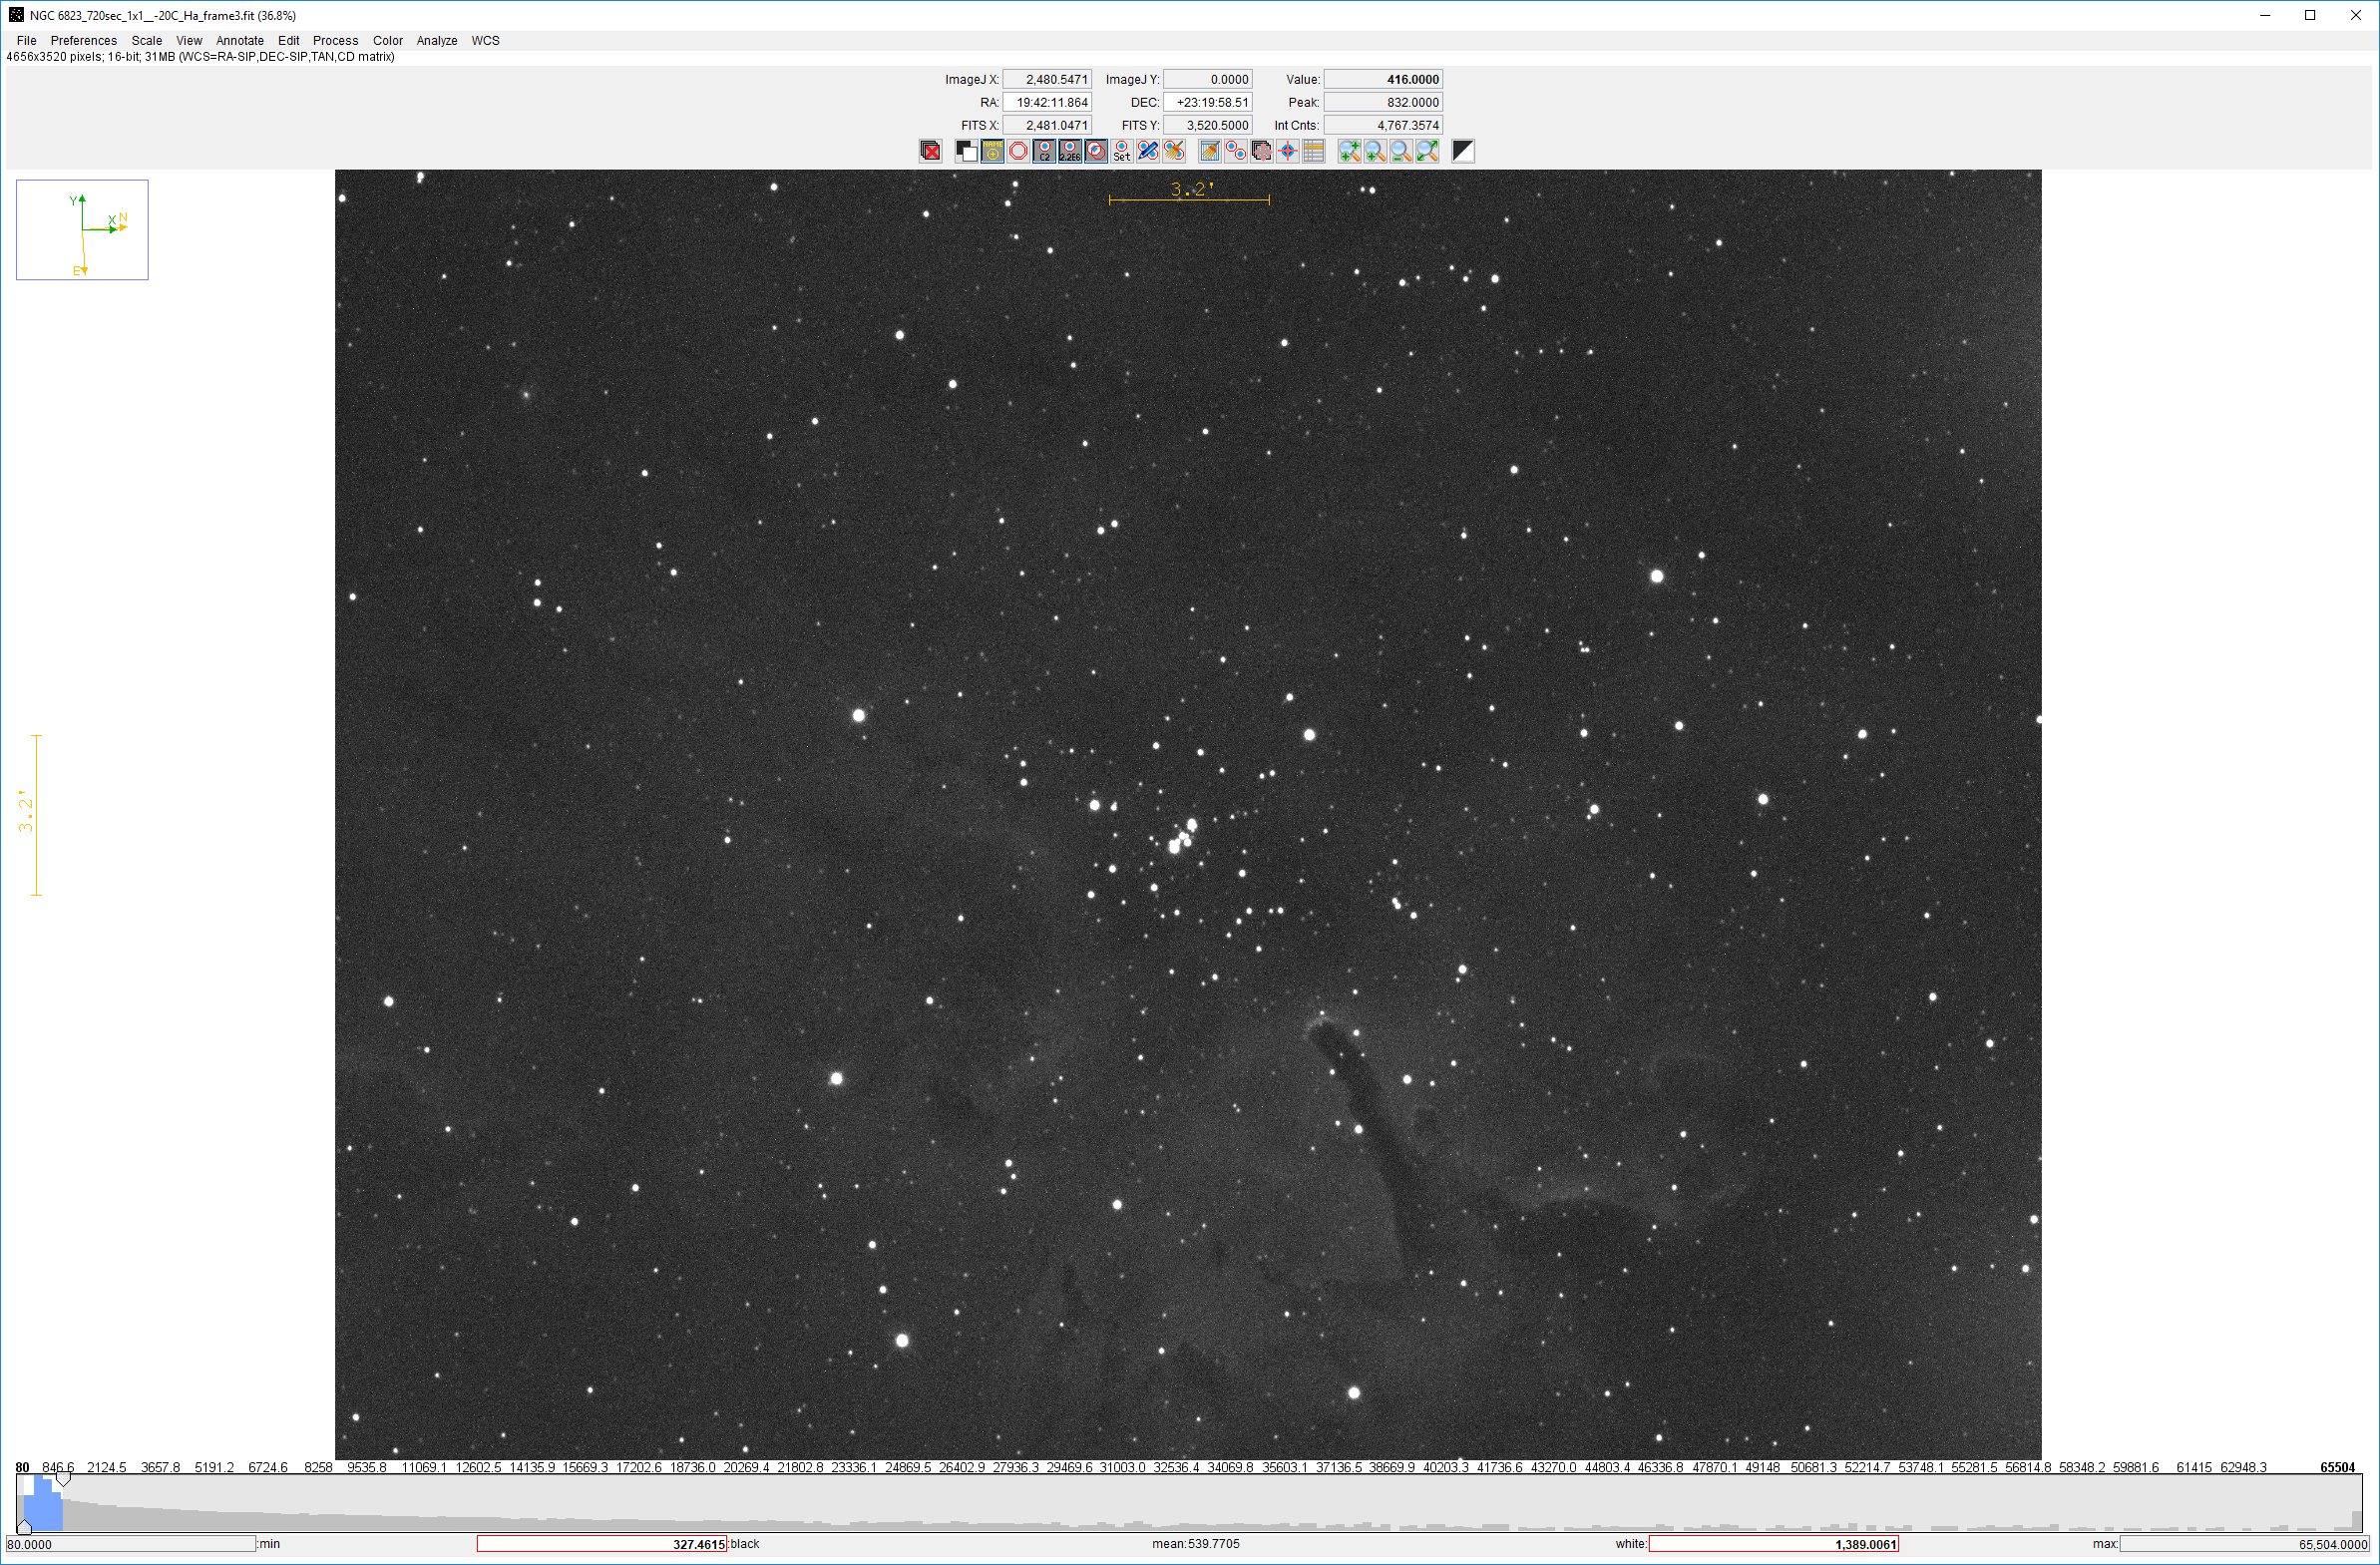
Here we have a un-processed HA Sub of NGC 6803.
Gain 75 offset 12, on an ASI1600MM-Cooled (in a white zone and some moon)
I am displaying in AstoImageJ, a free tool used by astronomers for Photometry etc. (because I don’t have pixinsight). I guess you could call it an “auto stretch” but you can see it has selected a black point of 327 ADU and a white point 1389.
Everything you see that is not pure black, or pure white, is between ADU 327 and 2903, so there are only 1062 different levels of brightness there. Since I’m shooting Nebulea, that is “my area of interest”
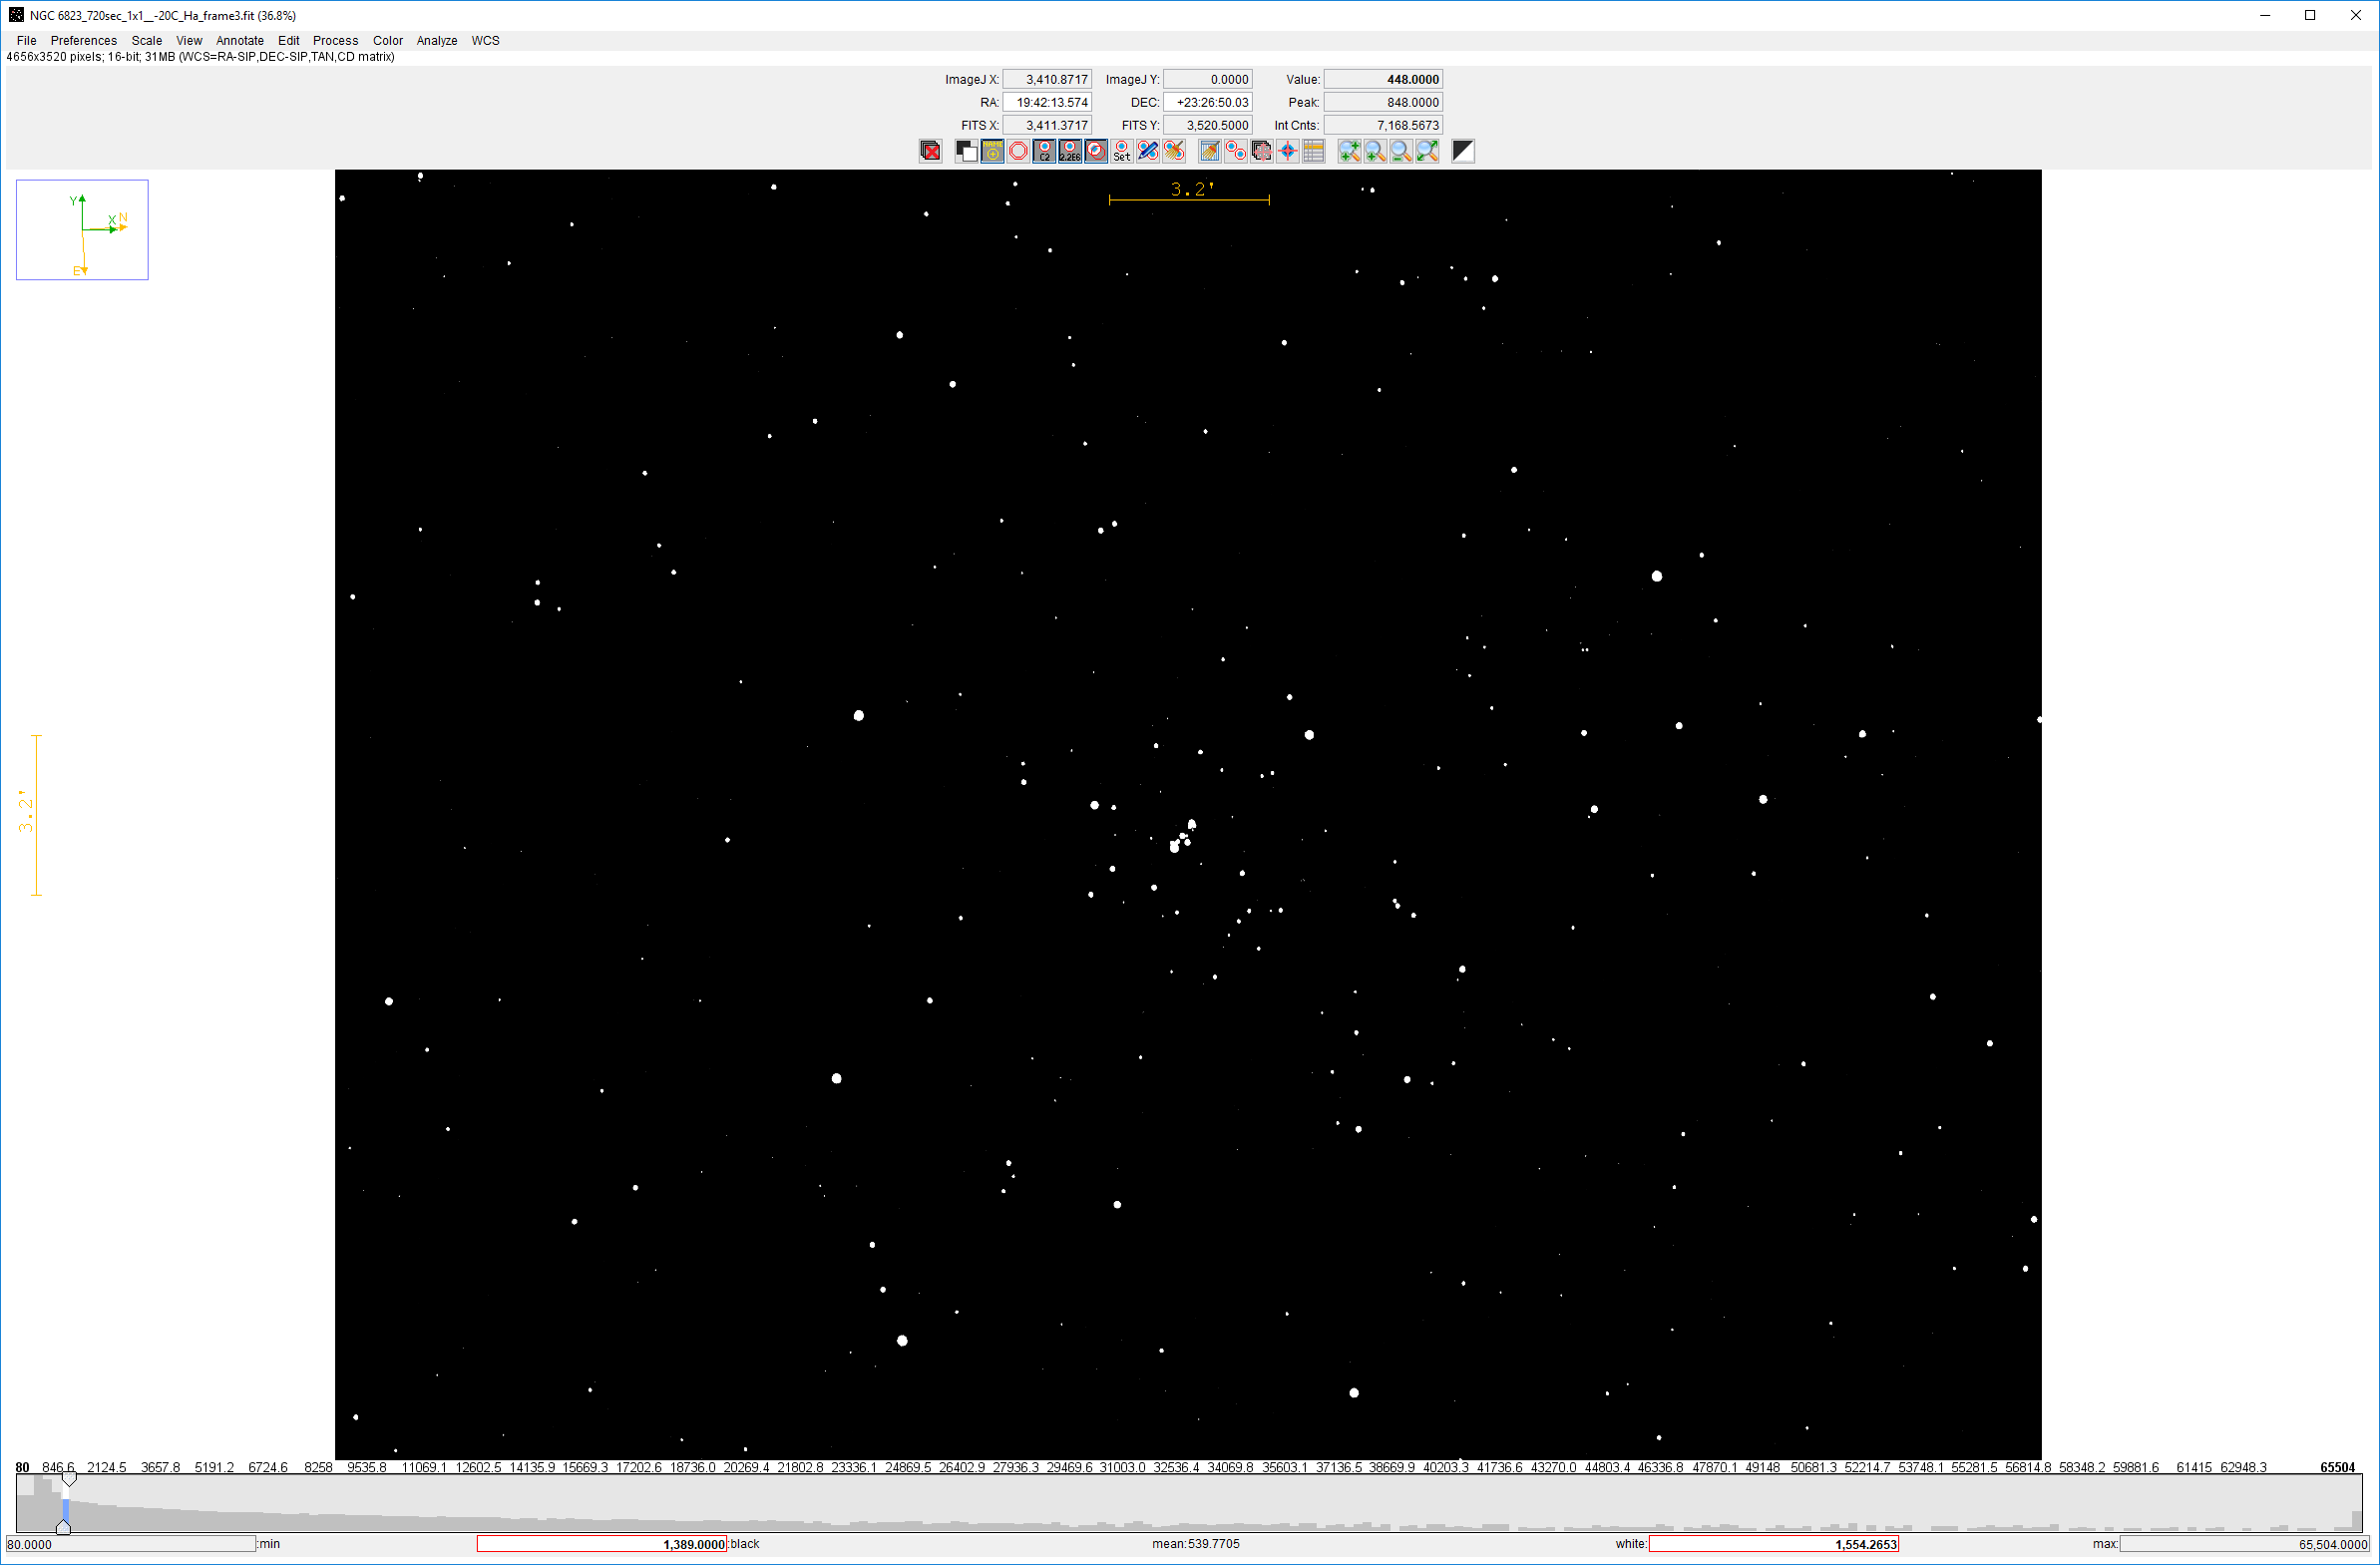
Just to prove that point, if we move the black point up to what was the white point (and leave the white point just above that) We can see that there’s nothing left but stars. No nebulousness remains.
OK so again, the area I would like to get the max tone variation is the Nebulaosity between ADU 327 and ADU 1389, but besides post processing can I do anything with camera settings to improve on those only 1062 different brightness levels? Let’s check by converting those ADU back into e- using the ADU/e- for that gain 75 setting the sub was taken at.
That gives us an e- range of 683.43 to 2903.
Now what if we raise the camera gain to “200” or 0.506479725 e-/adu? At that gain if we convert from e- back to ADU we have ADU values of 1349 and 5731. OK so now we have more than 4 times the number of different brightness levels, covering the nebulocity, coming out of the camera (4382 to be exact).
So by turning up the gain I would get a 4x (2 stops) improvement in dynamic range for my nebula.
As I said a couple of posts up, yes the stars will be fat and clipped, but I’m going to tone map those out of existence anyway. I’ll shoot some 10 second OSC or RGB frames, set the black point really really high, and just put that as a top layer in Photoshop in screen mode (no need even for a star mask, because the black point is so high above anything but the stars).
Only issue is those stars will be small (a good thing) so won’t completely cover any of the artifacts of removing the NB stars, but that’s what tone-mapping techniques are all about. It’s a good way to make fewer and smaller stars so as not to detract from the Nebula.
So here’s an actual unprocessed sub at gain 200 as described above, with the wider 4382 range selected.

What I found interesting is I can actually see nebulosity as I move the white point up, all the way to about 24,000 ADU (where as I couldn’t see any above the auto selection in the gain 75 sub), so there is definitively even more dynamic range (for the nebula) than I predicted.
Oh, I forgot about the *16 multiplier to go from 12bits to 16, so I should re-calculate things, but hopefully I have still illustrated my point.
Here’s a 19x720sec stack of the gain 75 subs. No porcessing or scaling except the auto brightness and contrast in AstroimageJ:

AstroimageJ’s auto brightness and contrast has chosen an ADU range of 1268 ADU (115 to 1383).
Now here’s a 45x300 sec (almost the same total integration time) of the gain 200 subs:
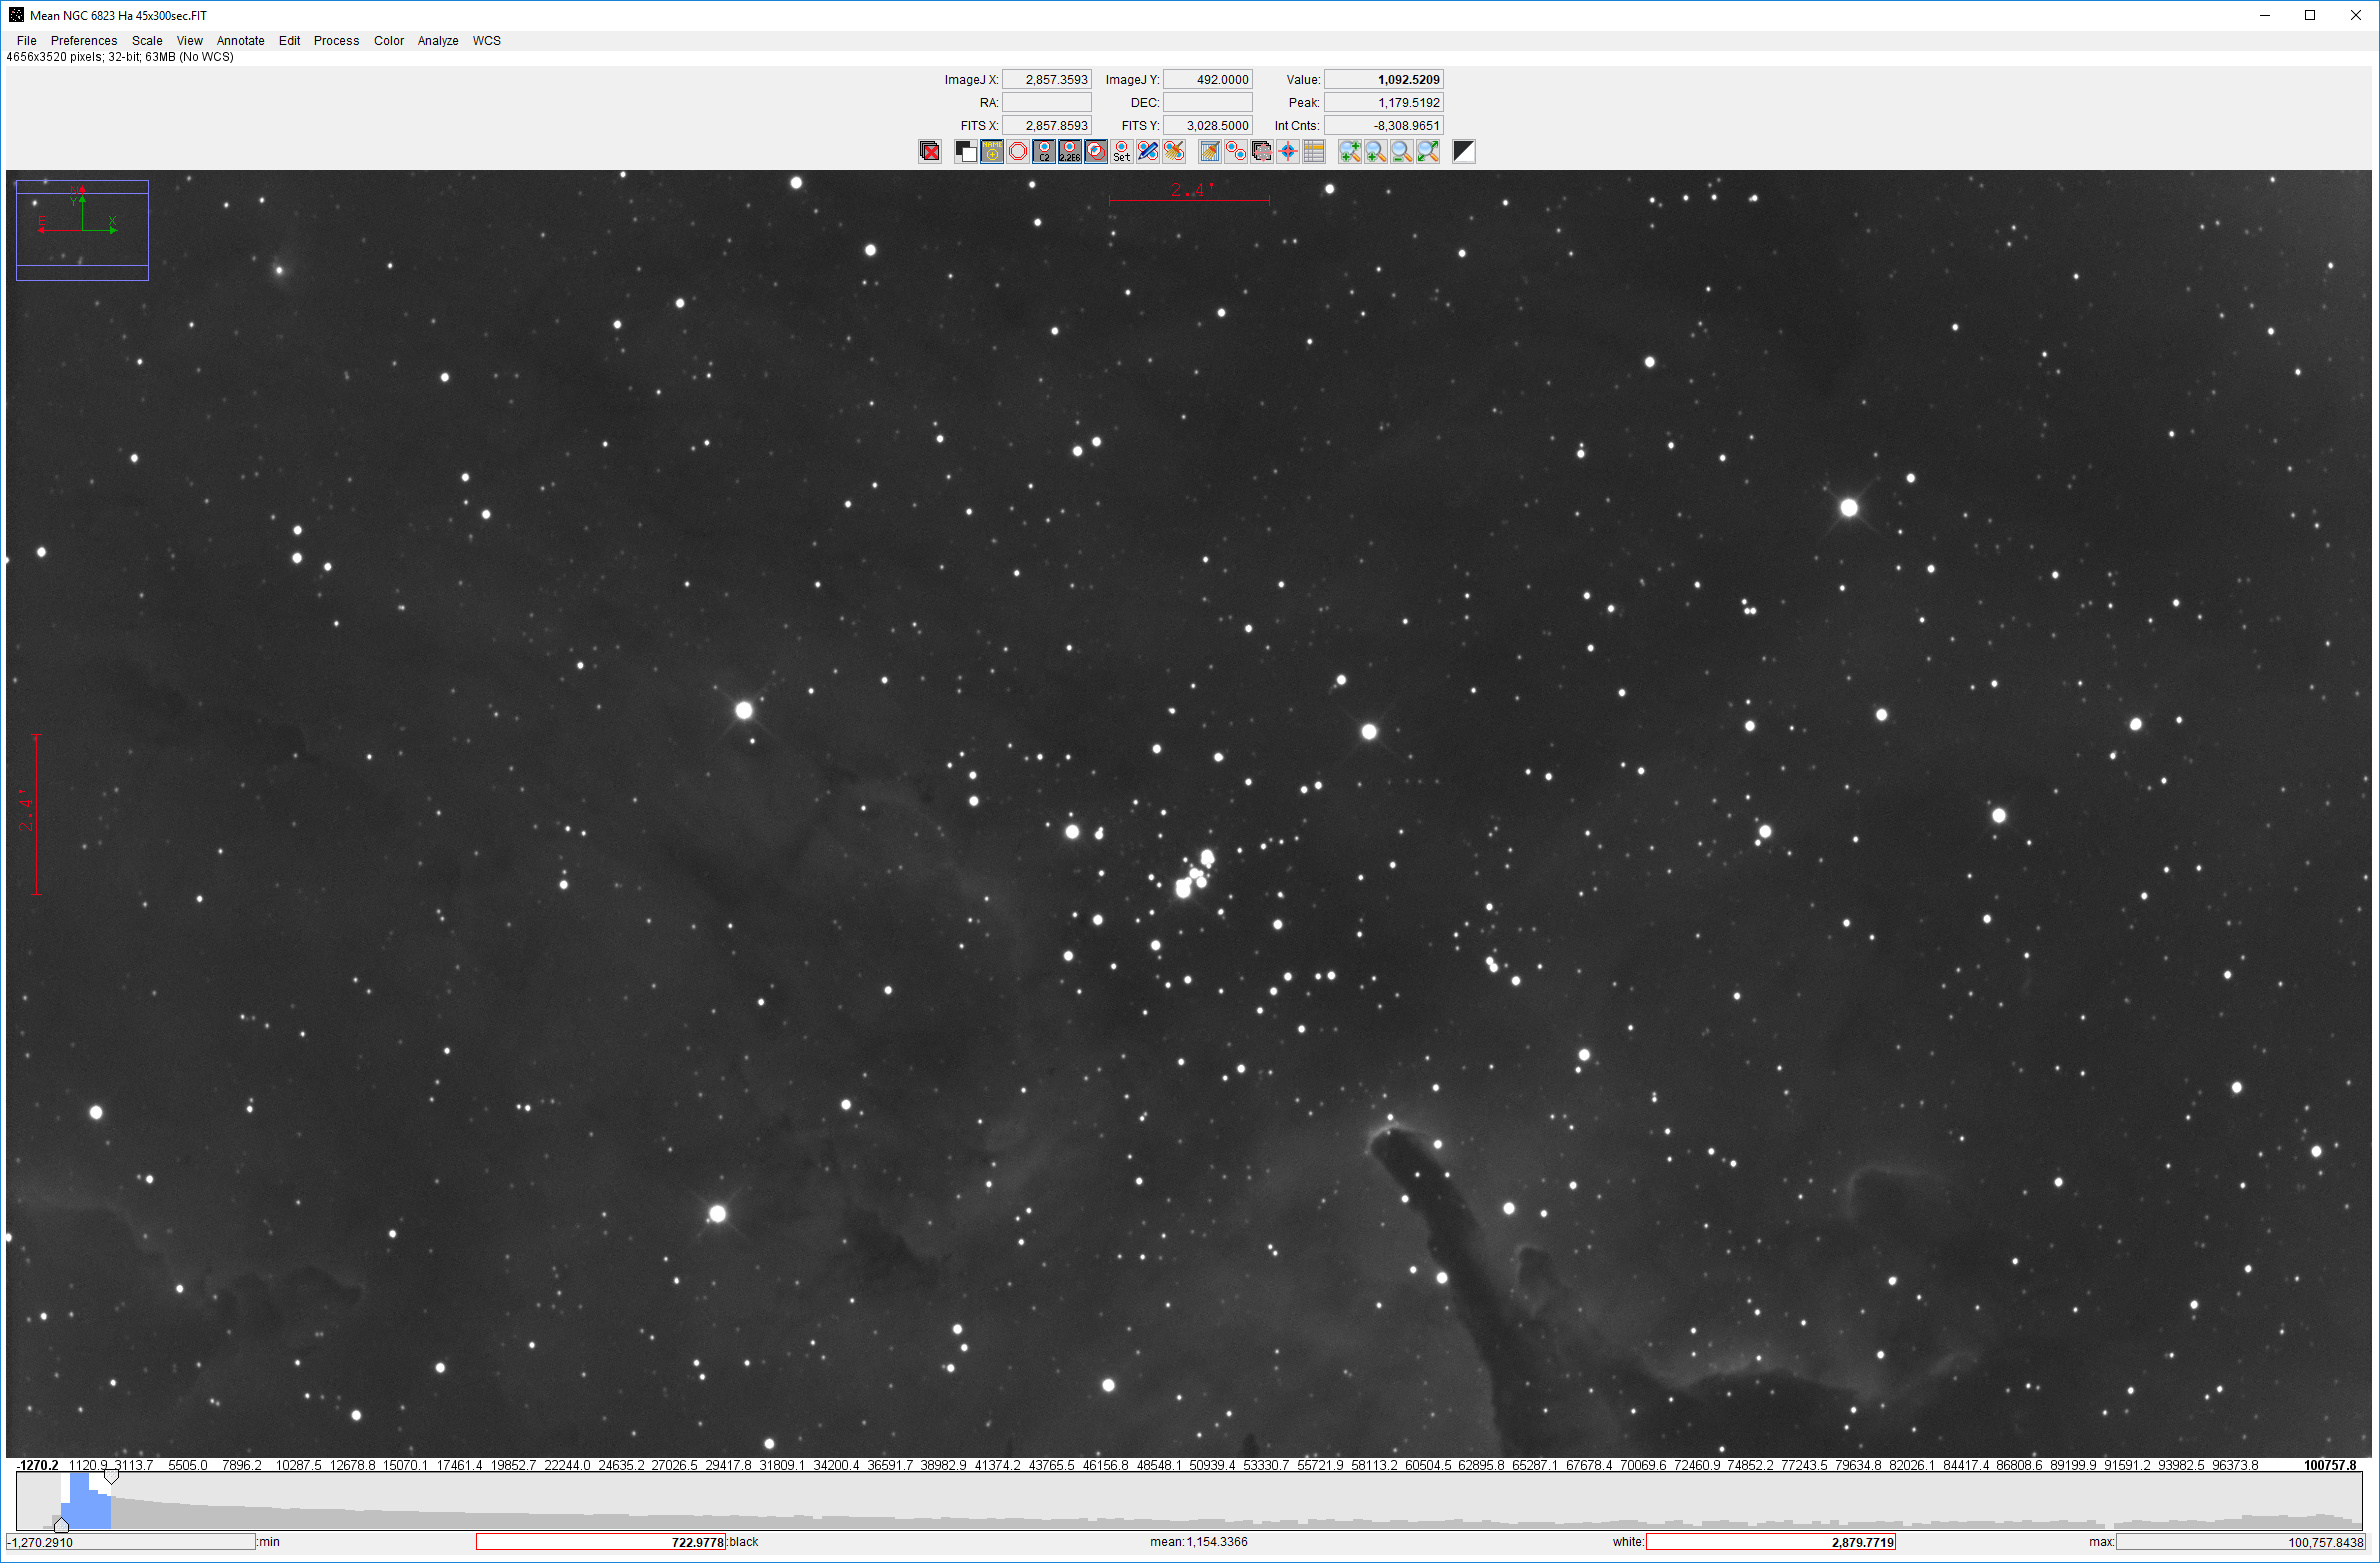
As you can see AstroImagjeJ’s auto brightness and contrast as chosen an ADU range of 2157 (722 to 2879.
So, again I conclude that for the “area of interest”, the nebula vs. stars, I’m getting more dynamic range using a higher gain.
Let’s see what happened to the stars.
At gain 75, here is profile of one of the fattest stars"
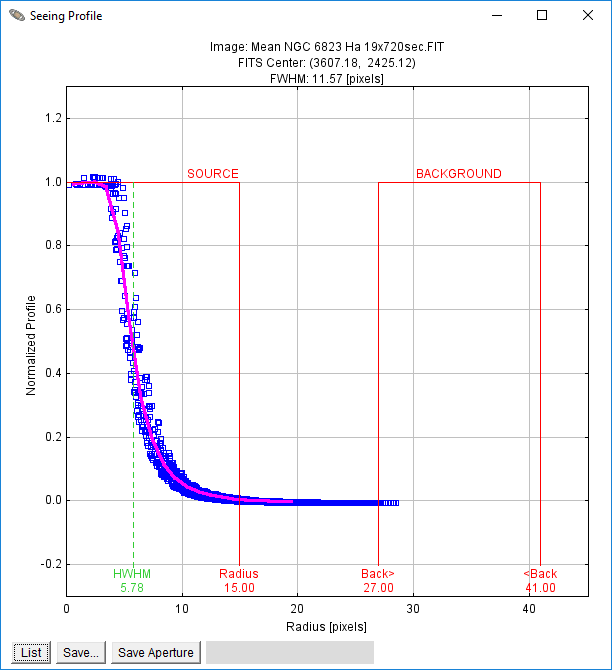
No let’s look at the same star at gain 200:
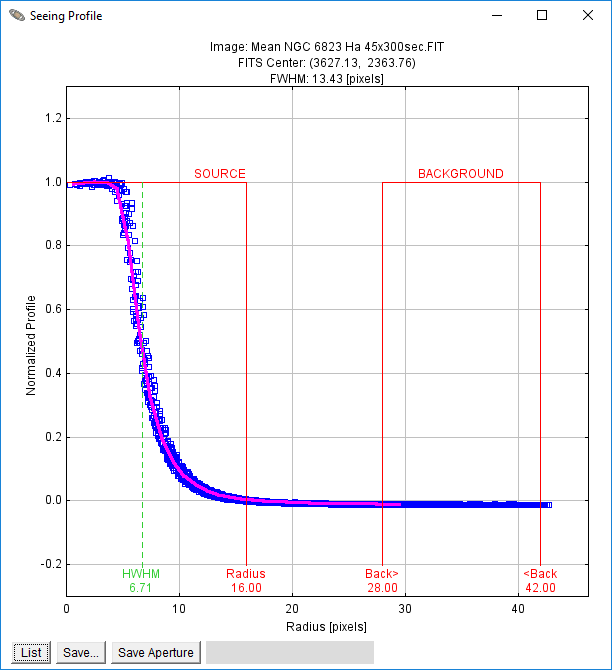
So at gain 200 the radius of the fat star has increased by 1 pixel (.46 arcsec/pix is my bin 1 resolution) and the HWHM increase from 5.78 ti 6.71.
Looking at the two stacked images the difference in the stars is not that apparent.
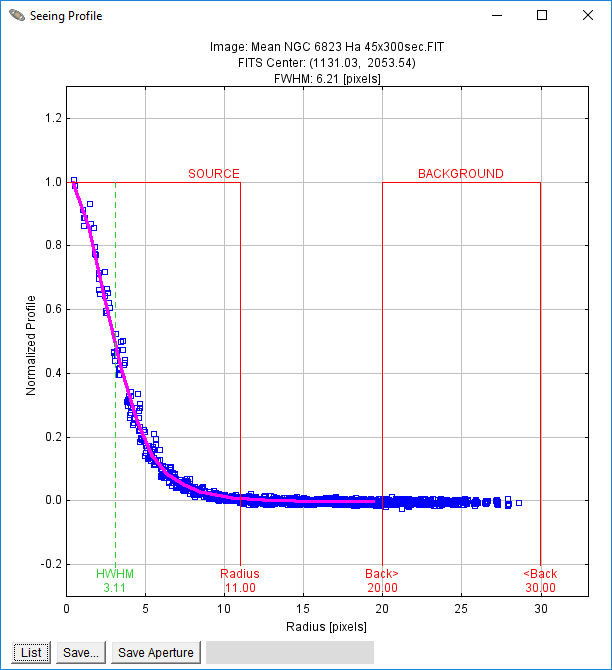
Checking a (mostly) unclipped star at gain 75:
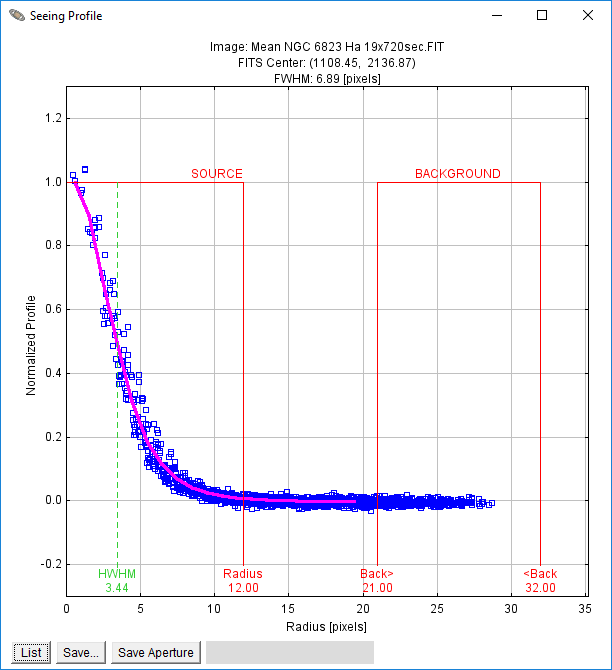
And the same star at Gain 200:
That one comes out smaller and tighter, so the higher gain was definitely not a problem for that star.
Let’s sanity check the seeing in ArcSec ( vs. pixels). Here’s the same star, just plate solved the image in AstroImageJ, so it knows the image scale:
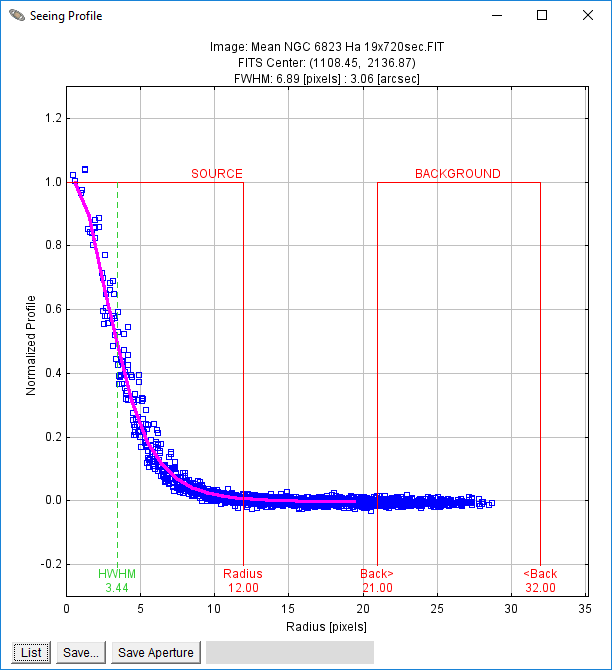
Measured seeing (of the gain 75 stack) is 3.06 arcsec.
Our measured seeing (of the gain 200 stack) was 2.76 arcsec.so perhaps the seeing was a little better for the gain 200 stack.

I would conclude, however, that the stars really didn’t suffer (if I decided to keep the NB stars) AND I clearly got more dynamic range for the Nebula at gain 200.
You can’t shoot something at a reduced dynamic range to prove that you don’t need the higher dynamic range. You are just fooling yourself with this argument because you don’t see what is missing. As for your last post, you can’t get “more dynamic range” than you started with from the camera. It is physically impossible. Any perceived gain of dynamic range is an illusion - you can’t stretch and add bits that aren’t there to start with. What you are seeing is binarization of the existing bits. Whatever dynamic range you start with at exposure time is the most that you will ever have. My example pictures show that the subtle details are in the low bits. You can ignore this fact if you wish but it does not change the reality - more bits do mater. The only reason I continue to engage in this discussion is so that others reading these posts are not mislead about the importance of dynamic range. You can choose to use a limited dynamic range but do so with the knowledge that you are losing details. If you are shooting a star cluster that is mostly bright stars, perhaps a reduced dynamic range will suffice but if you are shooting something with gas clouds or dust lanes, you need a high dynamic range.
Some how you are missing the point of my argument. I’m not trying to do anything with post camera data or manufacture “bits” or DR that isn’t there.
We could both be talking about the same rule of thumb if we just change it to “expose the brightest thing you are interested in to just below saturation”,
I’ll try one last time. If you have some target and you expose it so the stars are just below saturation, I observe that the area of interest, the DSO (Deep Sky Object)'s data ends up towards the very bottom of the available ADU values. This must be where we disagree, you think it is spread out all the way to the brightest stars.
OK so we disagree on that. Coming back to my supposition, a higher gain will spread that same range of e- for the DSO across more ADU, giving you more dynamic range, for the DSO only, out of the camera. Simple math, less e-/ADU means more ADU values for a given range of input e- values. Or flip it over more ADU/e- means more different ADU values for a given range of e- (within the range that camera can put out at that gain).
To illustrate:
If this represents an exposure at low gain with no clipping:

Then this is what happens if we apply some gain and adjust the offset and exposure time.

(except there would be a bar or two at the very top end representing the saturated stuff)
In both diagrams the “Deep Sky Object” is caused by the same range of amounts of photons hitting the sensor, or the same range of e- values.
What we have done is change the e-/ADU (the gain) to get more digital values to represent the same range of analogue input data. What we sacrifice is we run out of headroom at the input of the ADC and bright stars may be saturated, or more of their cores saturated.
I am confident about the location of the DSO on the histogram because EVERY astroimaging display program has some sort of autostrech that tries to show you the detail and it’s always around the peak and right side of the histogram. I previously showed this in AstroImageJ. We’ve all seen it in SGP (with autostrech on) and here’s another example by and for professional astronomers, fits liberator:
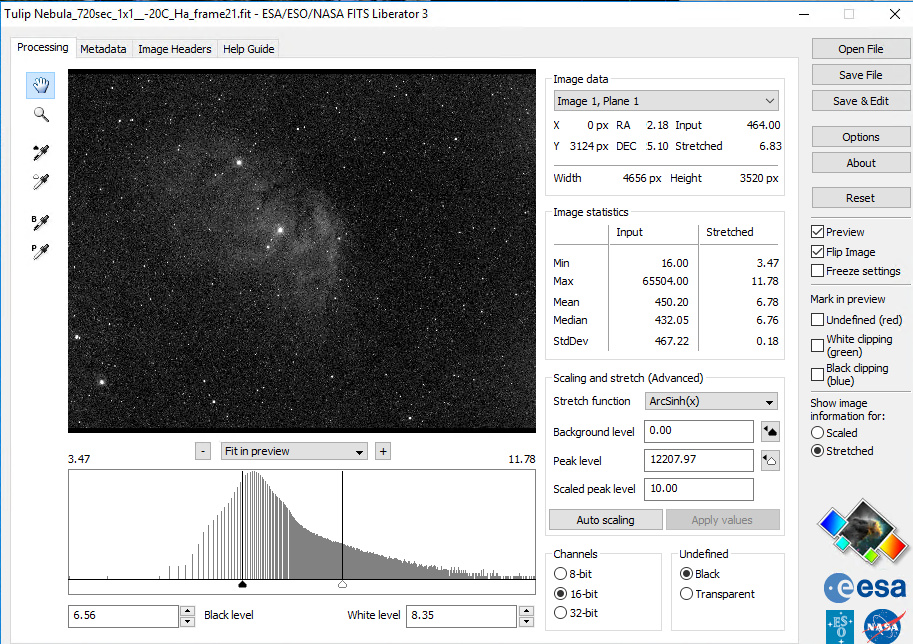
In that one there are various functions that can be select for the stretch, but all emphasizing the low end of the exposure.
Also confident from processing with levels and curves in photoshop. Stretching the low end to bring out DSO detail, protecting the stars from getting blown out at the middle and top end of the histogram. Matching color channels of DSO objects by matching the shapes of the histograms with mid-tone point at the right hand end of the peak or hump.
However, if one thinks it’s important to preserve the ENTIRE range of input values and not have any saturation, then yeah, the above won’t get you that. If will get you more ADU values for a DSO out of the camera, IMO.
100% correct. For a single exposure.
Again, you’re still ignoring the effects of stacking on quantization error, noise and dynamic range. You’re still assuming that everybody is processing data in a relatively straighforward way, but the truth is that many of us are crazy enough to do some fancy things, like combining wildly different exposures taken with different exposure times, different filters and maybe even different sky conditions.
You mentioned the fact that you started as a terrestrial photographer: well, landscape photography is HDR land. What HDR is all about is mixing different exposures to increase the dynamic range of the stacked final image. And, lo and behold!, the best way to do HDR with a DSLR is by using ISO-bracketing, not exposure time bracketing (read: different gains for different exposures). But don’t take my word for it, see for instance:
Hasinoff S. W., Durand F., Freeman W. T. - Noise-Optimal Capture for High Dynamic Range Photography Massachusetts Institute of Technology - Computer Science and Artificial Intelligence Laboratory
It’s not uncommon, in narrow band imaging, the get rid of the stars and to replace them by using a different set of (L)RGB exposures. Some other imagers don’t care of saturating stars in narrow band, as they still prefer to have them white rather then purple or some other unnatural color. The issue here is that all these guys, including myself, look for a very good digitalization of nebulosity and don’t care at all about stars. In terrestrial photography that would be “exposing for the shadows”. If I’m shooting a model, and I plan to replace the background, I want the model to be correctly exposed and I don’t care if the sky gets pure white (on the contrary, that would be helpful to cutout the model from the background). If the sun is in your frame, it is bound to come out white (unless the sun IS the subject). So, would you care to set your exposure to get an unsaturated sun? Hardly.
Under reasonably dark skies and with a good Ha filter, you can get just a handful of electrons per pixel. Use a low gain (or zero as you recommended initially) and you’ll get just a couple of different ADU values in output (e.g. with less than 10 e- per pixel and a gain of 5 e-/ADU you’ll get in output either 0 ot 1 ADU and you’ll have a hard time to stretch that). Only when you have enough noise that superimposes to the object’s signal, than you may get a decent digitalization of your target with an acceptable quantization error. With narrow band that may be the case or not, depending on the specific target, the optical configuration and the specific camera you are using.
In general terms, an example is not a proof unless, it is used to falsify a thesis. If you really want to proof that the optimal SINGLE exposure must always be the highest possible DR, it’s not enough that you show a picture. You must either proof that for ALL possible examples (in all possible system configurations) or use a mathematical demonstration. Starting from a 32 bit floating point image and converting it to an 8-bit integer image does not proof anything, because in that way you are actually deleting the contribution of several images to the stack. But even if your example was correct, none of us is really willing to work with an 8-bit DR. Our “high” gain settings make us loose not even a full stop of dynamic range.
If you want to be useful to the community, then you should take care of taking into account all possible use cases of your thesis, rather than proposing generalizations without specifying which are the bounding conditions of your assumptions. Saying that DR is everything you should look for is, IMHO, misleading. You should say instead that, under conditions X & Y & Z, then you should privilege DR. An example? DR is overly important if you’re shooting LRGB and/or light pollution is a factor. Nobody is denying that, but there’s an accompanying boundary condition.
2 Likes
@alessio.beltrame - Sounds a bit testy to me.
@dts350z - “We could both be talking about the same rule of thumb if we just change it to “expose the brightest thing you are interested in to just below saturation”". True if you are willing to blow out the brightest parts of your image. You are assuming that there is nothing interesting in the bright parts. Your illustration of a histogram seems to support the limited dynamic range idea but it neglects the fact the once it is stretched those upper bits will become significant. I have found many times that with the right stretching I can get details at the upper end which would not be possible if I over exposed it. For example, the core of a galaxy is often as bright as stars yet it does contain a brightness gradient if you don’t blow it out. Your discussion assumes that you reduce the dynamic range and then place the range over the “interesting parts” but the hump in the histogram is not what defines the interesting parts. An upstretched histogram is very misleading - there is good bit of detail above the hump. I prefer to try to maintain as big a range as possible and keep my options open. I think it is ok to slightly overexpose but if you over do it you get blooming and loose detail at the top end.
I’m OK if we restrict my points to Narrow Band. That’s what I meant them for in any case.
Low gain for LRGB or OSC, to get max dynamic range out of the camera.
Higher gain for NB to spread the ADU range for the DSO of interest and also not have stupid long exposures (because of guiding challenges, satellites, planes, etc.). But not if don’t want any Saturated stars (although in my experience you will have SOME saturated bright star cores even at low gains.
Or maybe it should by target. Low gain for Galaxies, Globs, and stars that you are going to paste into NB images (or just really, really short exposures at whatever gain is convenient for that last one).
High gain for Nebulae (Bright, Dark, Planetary, Super Nova Remnants, Hii regions, etc.).
In my limited experience with NB, I’ve not found a big difference in exposure time for RGB vs Ha OII SII. If that sounds surprising I agree but that’s what I’ve found so far. Implicit in what your are saying is that somehow NB has less dynamic range than RGB. Again, that has not been my experience.
You mention LRGB and I’ll point out that a lot of experienced imagers suggest that there is no point in doing the L part if you are using equal binning for L as for RGB. With the 1600 camera, I’ve had some great images just doing RGB. You are better off using the time you would use for L exposures to do more RGB exposures.
Well I was fortunate to find an almost new ZWO ASI1600MC-Cooled on cloudy Nights for a good price so now I just do OSC (vs. RGB) and put my ASI1600MM-Cooled on the right for NB.
Light pollution filter for OSC, NB filters for NB.
Sorry, but this is wrong. Stacking increases dynamic range. You can think of the result of stacking in two ways…you either work in a purely additive move, where signal in terms of DN grows linearly and noise grows in quadrature, or you work in an averaging mode, where signal in terms of DN converges on the correct value (effectively stays the same for large numbers of subs) and read noise shrinks in quadrature.
Dynamic range is FWC/RN. Since we generally average with stacking, the effective dynamic range (in most simplistic terms) in a stack is FWC/(RN/SQRT(SubCount). Read noise is averaged down as you stack, therefor dynamic range, or alternatively you could say bit depth, or tonal range (my preference, although it is maybe a bit to “terrestrial” in this context :P), increases.
A single sub should balance the two ends of the scale: clipping in the stars vs. sufficient signal in the background to swamp read noise (and by swamp, we mean render effectively moot within the context of stacking.)
Ideally, you would want to swamp your read noise by no less than 3xRN^2…and preferably more around 10xRN^2 or more (if possible). If you swamp read noise by 10xRN^2 (ten times the read noise squared), you get ~95% stacking efficiency. That means if you had a noiseless camera, a sub on a noisy camera that swamps the read noise by 10xRN^2 would have 95% the efficiency of the noiseless camera. You can potentially get to 97% or even 98%, however it takes much longer exposures that increase your risk of losing a sub to one of numerous factors. Generally speaking, anything with stacking efficiency over 90% is generally good enough to produce darn close to ideal results with stacking.
2 Likes
I do think it is probably confusing to use dynamic range here. DR would generally be the saturation point over the read noise, or perhaps over the total background sky noise. The former would model effective camera DR, as if the camera had read noise as low as in the stack. The latter would be more of a model of effective real-world bit depth in the stack. The latter, to calculate effective bit depth in the stack, is usually what I prefer to use when discussing “range of information within the stack”.
At a higher gain, the camera definitely has lower dynamic range. There is no getting away from that. That said…at a higher gain, you usually use shorter exposures. Using shorter exposures usually means you acquire more subs and stack more subs, which means you recover more bit depth through stacking than if you use longer subs at a lower gain. This in the end helps to normalize the effective dynamic range of your stack. For a given camera, usually with reasonable stack sizes (which i would consider to be up to around 300 subs…you can certainly stack more, but you need to stack a LOT more for it to be useful, so it becomes a much greater challenge), a deep stack at a high gain will have similar DR as a shallow stack at a low gain.
The low gain may have an advantage in DR, even compared to a deep high gain stack, in fact…however things may not be just that simple. Lower gains, at least on CMOS cameras, often have more FPN. Notably more banding and similar issues. Long exposures usually have brighter glows. This FPN can warrant even longer exposures to effectively bury this additional unwanted pattern noise, which can diminish DR and balance high and low gains even more.
I think what you are trying to describe is not the dynamic range of the signal, but it’s fidelity (kind of like high fidelity audio…which is about the quality of the audio). The higher gain reduces quantization error, thus allowing you to sample the signal with greater precision and accuracy, producing a higher quality signal. That signal may not have maximum hardware DR, but if you don’t actually need all that much DR…such as with shorter exposures and narrow band filters, then the higher quality signal is valuable and useful as it separates finer, fainter details more readily and produces a more natural normal noise distribution with fewer patterns.
The fidelity or the overall quality of the signal is high at higher gains, and often low at lower gains, with CMOS cameras. A low fidelity signal, one that has higher FPN, brighter glows, more hot pixels, etc. may require more stacking to average out all of those things as well…which can diminish the value of greater hardware dynamic range at lower gains.
2 Likes
That is not the case in my experience (with CCDs). My RGB exposures typically use 2-5 minutes to the onset of clipping the brightest stars. With 5 or 3nm narrowband it requires longer exposures to register something. Most will agree Ha is the strongest signal with OIII and SII being considerably weaker. There are a few nebula where this is not so, but I would say they are the exception. When I’m imaging I will take 2-3x more 10 or 20-minute exposures of OIII and SII and the stacks are considerably noiser than the Ha stack.
I don’t think that is the case. Any data I’ve seen on stacking tells me that it increases signal to noise by averaging out the noise which does have the effect of making the lower bits more meaningful, however, there is no increase in bit depth. The only way to increase the bit depth with stacking would to be to do stacks of overlapping exposure values to get an HDR result. Here is a good analysis of the effects of stacking; Image Processing Stacking Methods Compared, Clarkvision.com
So it depends on what you mean by “dynamic range”. Stacking does reduce the noise thus improving the detail in the low bits but there is no increase in overall bit depth.
It seems a little strange to me that ZWO camera owners are having to figure this out on their own. ZWO sells these cameras specifically for astronomical imaging. Why has ZWO not published definitive guide lines for using their cameras for the various types of astronomical imaging being done with their cameras? If stars, galaxies, nebula, etc. require different gains and offsets, it seems to me that ZWO should tell its users what those are.
Charlie
Amen to that!
Yes I’ve been trying to boil all this down to some simple rules of thumb I can include in my lectures and videos (which up to now have been DSLR based).
It’s been quite a journey, and frustrating, as everytime I think I have it nailed down it gets slippery again.
Astro cmos cameras; To bin or not to bin, and proper exposure is discussed endlessly (sometimes flogged on by me in search of simple rules and/or software aids) on forums, etc.
When I first got my current rig, 12" RC truss, CCDT67, filters/filter wheel and ASI1600MM-Cooled, I was super stoked and happy with initial results, just “exposing to the right” as on a DSLR and using the minimum read noise setting provided by ZWO in their driver.
From my much darker than where I am now location I quickly produced some (I thought) nice images:
Then the feedback started damping my new found joy. Halos around bright stars, blown out stars, etc.
Tried to fix the halos in PS, and diagnose the problem. Turns out to be the ZWO (pre 2018) filters. Note: some people have another problem with different looking star halos, that are caused by the sensor glass as delivered by panasonic to zwo and others.
Then I started replacing stars and researching better exposure settings.
Moving to a new home (sadly in a white zone) then slowed me down but basically I went from sort of “fat dumb and happy” to stressing about exposure and not being able to get to a simple rule to do it right, that somewhat continues to this day.
Now I image from a while zone, taking 11 hours to produce what you could do from a dark site in 45min:
but then I don’t have to drive, haul my heavy gear, and can comfortably sleep in my own bed while imaging.
Still, the hunt for “proper” exposure following simple rules for these new cmos cooled astro cameras continues.
Going back to a post further up the thread before the lastest lively DR discussions here is my latest attempt (that I wanted feedback on from multiple folks);
“Expose to the right” becomes more specifically:
Use this table of offsets and gains and median ADU (as shown in SGP):
“Median ADU shown in SGP:
Gain 0 Offset 10: 400 ADU
Gain 75 Offset 12: 550 ADU
Gain 139 Offset 21: 850 ADU
Gain 200 Offset 50: 1690 ADU
Gain 300 Offset 50 : 2650 ADU”
Suggested setting for LRGB, OSC shots of galaxies, globs, clusters, etc. are Gain 75 offset 12.
For NB (and perhaps LRGB or OSC of Nebulae) try gain 200 offset 50.
Next point your scope at the highest point in the sky your target will pass during imaging. If it will cross the meridian, point just to the west of the meridian where it will pass (so you don’t need to flip during the next steps).
Do trial exposures (each filter). Your goal is to get a median ADU (as shown in SGP) that is at or a little above what is shown in the above table.
This will ensure your are above the skyglow and other noise factors, at the worst case sky position for your target (darkest sky due to LP).
Sanity check how much clipping you have for stars. If more than you want/can tolerate, lower the gain.
…
Now the other part of all of this that has frustrated me is the ability to predict what will happen to the exposure results if I change something.
I’ve posted before about teaching my DSLR students to use the highest iso setting in their camera to determine the proper exposure at the iso they will actually be imaging at, in order to same precious dark time.
I now understand the exact meaning of the gain numbers in these ZWO cameras, so can somewhat relate them to iso, or at least understand the math for “equivalent exposures” at different gains should be. However, when it comes to “median ADU” that doesn’t seem to be deterministic.
Similar with doubling the exposure at the same gain and how it affects median ADU.
Any input on that or my overall approach?
I want to be “fat dumb and happy” again !;0)
1 Like
@Jon Rista,
Yeah I was thinking similar re: my use of “Dynamic Range”. I think “resolution” or “bit resolution” might be a better technical terms. I stil need to talk about a “range” of ADU values, however.
And yes, the whole stacking thing I’m not considering. I’m watching with interest and testing the “smart histogram and brain” for exposures that SharpCap is developing, which does take stacking into account if I understand correctly, and was hoping for something similar here in SGP.
Thanks
@dts350z I think you are right there is really two different concepts of dynamic range in these discussions. One is defined by the physical bits of the camera (or resolution as you say). This is the maximum possible dynamic range - no amount of stacking will get you beyond this limit. Then there is the useful or noise limited dynamic range. Stacking will improve this limit. So when you choose a gain, you are setting the max dynamic limit which no amount of post processing will undo (assuming equal exposure values).